


How many times have you had a student (or even fellow teacher) moan about “the Circle of Fifths?” It is often explained in theory books in a very confusing manner, but you can simplify it for your students in a way where they’ll look forward to working on the Circle of Fifths each week!

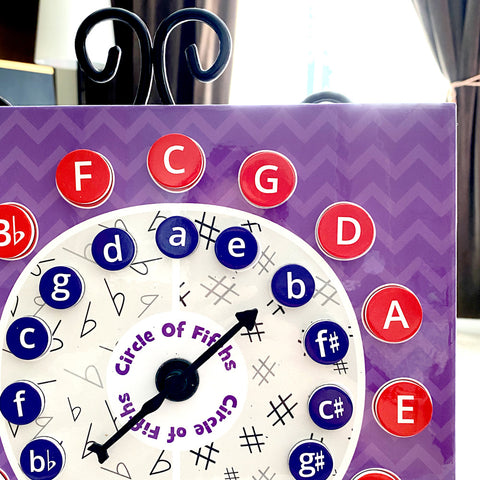
In its basic sense, here are five ways to use the Circle of Fifths Magnetic Board:
- Place the magnets for Major Keys
- Place the magnets for Major and minor keys
- Place the magnets for Major keys and write the number of sharps/flats for each key with the dry-erase marker (or use my new sharps/flats discs)
- Use the back of the magnetic board and dry erase marker for even more activities
In addition to using the Circle Fifths Magnetic Board to teach the Circle of Fifths, here are seven other games and activities you can use with the Circle of Fifths Magnetic Board in piano lessons.
(want to know more about the Circle of Fifths Magnetic Board? Read about it here)
1) Teach the Circle of Fifths hands’-on

Make the Circle of Fifths fun and interactive from the very first time you introduce it. Place all of the magnets for Major keys on the board and explain how the Circle of Fifths adds one sharp each time you go to the right and one flat each time you go to the left. Write the number of sharps or flats as you explain and then erase it and have your student write the number of sharps or flats on their own.

You can teach in a similar method when introducing relative minor keys. Have students figure out the steps to find a minor key from a major key and work your way around the Circle of Fifths board.
2) Quiz with magnetic spinner


You can quiz students in a variety of ways by using the magnetic spinner. For beginner students, place the major keys on the board and have them spin the spinner. When it lands on a key signature, the student must say how many sharps or flats are in that key signature. For more advanced students, place only the minor key signatures on the board and quiz the same way. To upscale this quiz, get our wooden key signature discs so students can pick the correct disc and place it next to the major/minor key.

Another variation for advanced students is to place all of the major keys on the board, spin, and they have to place the correct minor key signature where the spinner landed. You can flip the game and place all minor key signatures on the board and they have to spin then place the major key signatures.
3) Race to win


A timer makes everything more fun and delights your competitive students. Pull a timer out and see how quickly your students can place the key signatures in order. You can use this in the same way as the quiz above: beginner students can do the major keys, more advanced students can do both major and minor keys. You can also time the students with adding the number of sharps or flats as well. Make this a progressive repetitive game and keep track of your student’s progress each week. Can they beat last week’s record?
4) Compete in Group Lessons
Split your group class into two groups and get ready for some turn-based competition.
Group Lesson Idea 1:
There are three levels at which you can play:
- Major keys - number of sharps or flats
- Minor keys - number of sharps or flats
- Major and minor relative keys
Nominate one team member to be the “caller” for each team. Spin the spinner; when it lands on a key signature, Team 1 has to correctly call out the number of sharps or flats or the relative key. If they miss it, then Team 2 gets a chance to answer. Keep score to see which team can correctly answer the most questions.


Group Lesson Idea 2:
Each team will race to see who can complete the entire Circle of Fifths fastest. Each team nominates one player and these two players go head-to-head to see who can complete the Circle of Fifths fastest.
Alternatively, the game can be prolonged by each player taking a turn completing the Circle of Fifths. The teacher will time each team member and keep track of their speed. Whichever team is collectively fastest wins.

Group Lesson Idea 3:
Divide the major and minor keys equally between the two teams at random. Teacher calls out a key using only the number of sharps or flats (e.g. “I am a minor key with two flats.”). The team with the correct answer gets to “discard” their disc on the board. The first team to discard all their discs first wins.
5) Technique Challenge
Combine the Circle of Fifths Magnetic Board with scales and chords. Spin to a random key and the student must play that scale, chord, arpeggio, or cadence. Your advanced students can do both Major and minor keys and start on different scale degrees. For an added challenge, set the timer and see how many they can spin and complete in five minutes.
6) Transposition Challenge
Choose a short melody and challenge the student to transpose it into whatever key the spinner lands on. This can be used in easier piano pieces (5-finger position) or advanced music. You can also use this idea as a theory exercise where the student has to write the transposition on staff paper.
7) Scale Degree Challenge
Help your students master not only their key signatures, but also their scale degrees by using the spinner. When it lands on a key, the student must identify the scale degree you call out (e.g. “The mediant of F major is A”).
For a full-random challenge, you can create a second spinner on a magnetic board with 1-7 and the scale degree names: tonic, super-tonic, mediant, sub-dominant, dominant, submediant, leading tone. The back of the Grand Staff Magnetic Board works well as a second magnetic board where you can write the scale degrees with a dry-erase marker. Students spin for the key signature and for the scale degree.
8) Key Signature Games

Using the Wooden Key Signature Discs opens the door for even more games. Here are just two ideas.
Pass out key signature discs/tokens at random to students then call out a key signature (e.g. "A Major" or “F minor”). The student that has the token wins a point or gets to discard the disc onto the Circle of Fifths board. Whoever gets the most points or discards the most discs wins.


Expand to even more games by getting all four colored discs so each player/team gets a different color. One idea is to use multiple Key Signature Discs sets for a scavenger hunt. Create a list of keys (major and minor) for each student, set a time limit for students to find the correct disc. Add to the excitement by hiding the discs around the room.
Bonus: Weekly review idea

For my studio this fall, I’m giving my students a Circle of Fifths worksheet to complete at the beginning of each lesson (get yours for free this week only!). I’ll be timing them and seeing how their speed improves throughout the year! This regular review is certain to get the Circle of Fifths settled in their knowledge-base.

You can get this worksheet for free to use in your own studio here (this week only!)
Do you have more ideas?
What other ways do you like teaching the Circle of Fifths? Do you find the Circle of Fifths scary or fun?
Links
1 comment
You have the key signature discs as Treble clef. (Which I love!) Have you thought of making ones for the Bass Clef as well?
———
Music Escapades Shoppe replied:
I’m so happy you love the key signature discs! Yes, I actually made the ones for Bass clef, but decided to remove them from the set since there isn’t enough space on the Circle of fifths board to fit the key sig discs for both clefs 😊